

Analyze EMG data#
An electromyogram (EMG) measures the electrical activity produced by skeletal muscles. In this notebook, we will analyze the root mean square (RMS) of a biceps EMG signal recorded during a bicep curl. RMS processing smooths the raw EMG into a continuous envelope that reflects the overall level of muscle activation over time.
Analysis Choices#
When analyzing EMG data, we can decide to measure the peak EMG, the average EMG, or the area under the EMG, often called the “integrated” EMG signal. See Figure 54 in this guide for an explanation of different quantification methods.
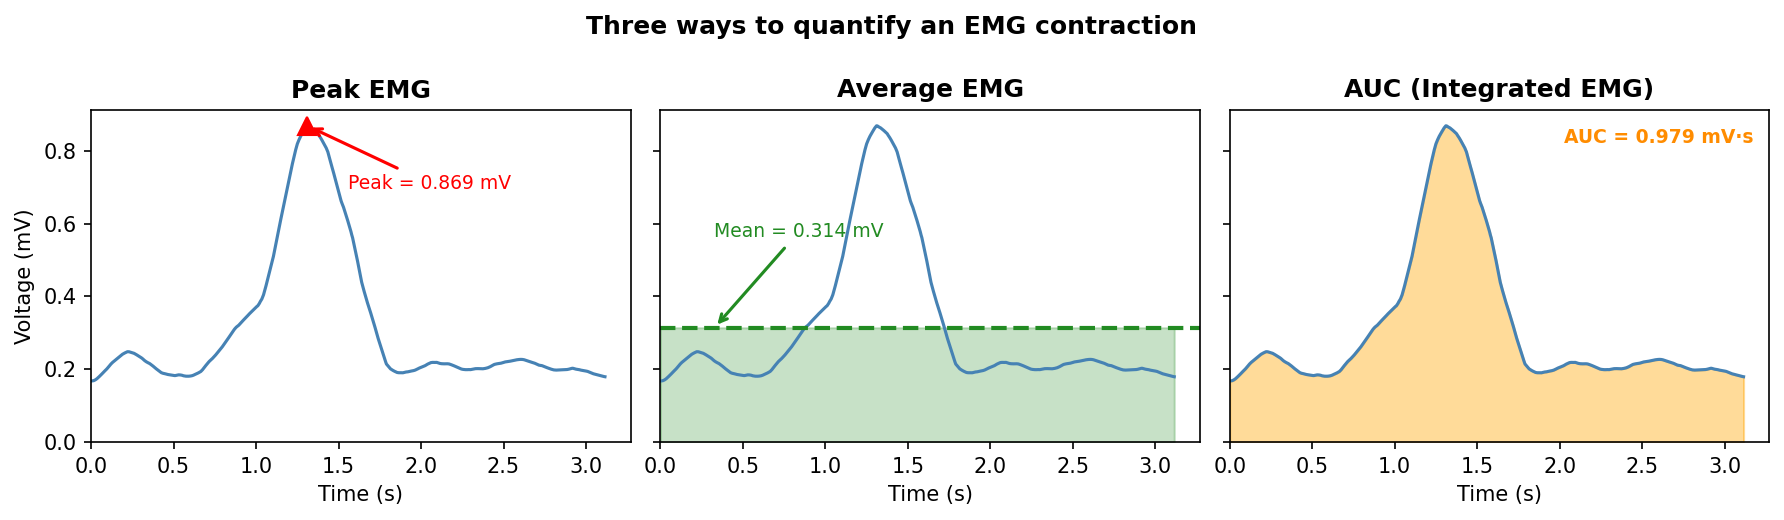
If you’d prefer to run this analysis in LabChart, you can do so following these instructions. The code below will allow you to analyze it in Python!
- Export a LabChart Text File (.txt) of your EMG recording.
- Upload the file to Colab.
- Change the
filenamevariable in the cell below to exactly match your file name.
import numpy as np
import matplotlib.pyplot as plt
from scipy import signal

# Change the filename to EXACTLY match your file
filename = 'baseline.txt'

# Define column names
columns = ['time', 'recording']

# Load the data (skip the 6-line LabChart header)
data = np.genfromtxt(filename, dtype=float, usecols=(0, 1), skip_header=6,
                     delimiter='\t', names=columns, encoding='unicode_escape')

recording = data['recording']  # RMS voltage in mV

# LabChart text files can contain a second header block mid-recording, which
# injects NaN values and one very large spurious number. Mark anything outside
# a plausible voltage range as NaN, then interpolate across all NaN values.
recording[recording > 10.0] = np.nan
nans = np.isnan(recording)
x = np.arange(len(recording))
recording[nans] = np.interp(x[nans], x[~nans], recording[~nans])

# Build a continuous timestamp array from the sampling interval
interval   = 0.005  # seconds (200/s sampling rate)
timestamps = np.arange(len(recording)) * interval

print(f'Loaded {len(timestamps)} samples | duration: {timestamps[-1]:.2f} s | interval: {interval} s')
Loaded 15970 samples | duration: 79.84 s | interval: 0.005 s
Step 1: Plot the entire dataset#
Let’s start by plotting the full RMS EMG trace. Each upward deflection corresponds to a moment of increased biceps muscle activity — in this case, one bicep curl. The baseline (resting) voltage is the low, flat region between curls.
The plot below is interactive, which helps a lot for longer recordings: drag the range slider beneath the plot (or click-and-drag directly on the plot) to zoom into any section, use the toolbar in the top-right to pan or reset the view, and hover over the trace to read exact values. This works the same way in Colab — no extra installation needed.
import plotly.graph_objects as go
from IPython.display import HTML

def plot_emg(timestamps, recording, title='RMS EMG Recording', burst_windows=None, peak_indices=None):
    fig = go.Figure()
    fig.add_trace(go.Scatter(x=timestamps, y=recording, mode='lines',
                              line=dict(width=1, color='steelblue'), name='RMS EMG'))

    if burst_windows is not None:
        for start, end in burst_windows:
            fig.add_vrect(x0=timestamps[start], x1=timestamps[end],
                          fillcolor='orange', opacity=0.3, line_width=0)

    if peak_indices is not None:
        fig.add_trace(go.Scatter(x=timestamps[peak_indices], y=recording[peak_indices],
                                  mode='markers',
                                  marker=dict(symbol='triangle-down', size=10, color='red'),
                                  name='Peak'))

    fig.update_layout(
        title=title,
        xaxis_title='Time (s)',
        yaxis_title='Voltage (mV)',
        xaxis=dict(rangeslider=dict(visible=True)),
        height=450,
        margin=dict(l=60, r=20, t=50, b=20),
        showlegend=False,
    )

    # Render as self-contained HTML (rather than fig.show()) so the interactive
    # plot also displays correctly on the built course website, not just in a
    # live Colab/Jupyter session.
    return HTML(fig.to_html(include_plotlyjs='cdn', full_html=False))

plot_emg(timestamps, recording)
Step 2: Detect bicep curl activations#
Next, we’ll automatically detect each bicep curl by finding peaks in the RMS signal, then clip out the full activation burst — from the local minimum before each peak to the local minimum after it.
Some recordings (e.g. a fatigue protocol) have contraction amplitude that drifts a lot over time — later curls can be several times taller than early ones. A single fixed voltage threshold can’t handle that: set high enough to reject noise late in the recording, it misses genuine early curls; set low enough to catch early curls, it also picks up smaller secondary bumps (like the release/relaxation phase after each curl) later on. To handle this, we track a local amplitude envelope — a rolling maximum over a short window — and detect peaks relative to that local envelope instead of a single global threshold.
Four key parameters control detection:
envelope_window_s— the width (in seconds) of the rolling window used to estimate local amplitude. Should span a few curls.relative_height— peaks must reach at least this fraction of the local envelope.relative_prominence— peaks must stand out from their surroundings by at least this fraction of the local envelope (this is what separates a real curl from a smaller secondary bump next to it).min_peak_distance— peaks must be at least this many samples apart; if two are closer, only the taller one is kept.
If too many or too few curls are detected, try raising or lowering
relative_prominence(the main knob for separating real curls from smaller in-between bumps) orrelative_height.If curls that happen close together in time are being missed or merged, lower
min_peak_distance(andsearch_window, which should stay smaller than half ofmin_peak_distanceso one curl’s burst window doesn’t reach into its neighbor’s).For a recording with well-isolated curls and long rest periods (little amplitude drift), try a larger
envelope_window_sso the envelope doesn’t track noise between curls.
from scipy.ndimage import maximum_filter1d

# --- Tunable parameters ---
envelope_window_s   = 20      # seconds; width of the rolling window used to track local amplitude
relative_height     = 0.7    # peaks must reach at least this fraction of the local envelope
relative_prominence = 0.7   # peaks must stand out by at least this fraction of the local envelope
search_window        = 100    # samples to search before/after each peak for the burst's local min (~0.5 s at 200 Hz)
min_peak_distance    = 300    # peaks must be at least this many samples apart (~1.5 s at 200 Hz)

# Local amplitude envelope — a rolling maximum, so detection adapts to
# recordings where contraction amplitude drifts over time (e.g. fatigue)
envelope_window = int(envelope_window_s / interval)
local_envelope = maximum_filter1d(recording, size=envelope_window, mode='nearest')

# Find peaks relative to the local envelope, at least min_peak_distance samples apart
peaks, _ = signal.find_peaks(recording / local_envelope,
                              height=relative_height,
                              prominence=relative_prominence,
                              distance=min_peak_distance)

print(f'Detected {len(peaks)} peak(s) at times: {np.round(timestamps[peaks], 2)} s')

# For each peak, find the full activation burst: local min before → local min after
bursts = []
for peak_idx in peaks:
    pre_start = max(0, peak_idx - search_window)
    start_idx = pre_start + np.argmin(recording[pre_start:peak_idx])

    post_end  = min(len(recording), peak_idx + search_window)
    end_idx   = peak_idx + np.argmin(recording[peak_idx:post_end])

    bursts.append((start_idx, end_idx))

# Standardize burst length — re-extract each burst centered on its peak using
# a half-width equal to the largest half-width seen across all bursts
pre_widths  = [peak - start for peak, (start, _) in zip(peaks, bursts)]
post_widths = [end - peak   for peak, (_, end)   in zip(peaks, bursts)]
half_width  = max(max(pre_widths), max(post_widths))

standardized_bursts = []
for peak_idx in peaks:
    start_idx = max(0, peak_idx - half_width)
    end_idx   = min(len(recording) - 1, peak_idx + half_width)
    standardized_bursts.append((start_idx, end_idx))

print(f'Standardized burst duration: {2 * half_width * interval:.2f} s ({2 * half_width} samples)')
Detected 5 peak(s) at times: [ 6.04 24.26 38.87 56.3  71.36] s
Standardized burst duration: 1.00 s (200 samples)
# --- Plot 1: Full trace with activation bursts highlighted ---
plot_emg(timestamps, recording,
         title='RMS EMG — Biceps (activation bursts highlighted)',
         burst_windows=bursts, peak_indices=peaks)
Step 3: Calculate peak voltage of each burst#
The peak EMG is the maximum voltage reached during a contraction. It reflects the single highest level of muscle activation, but — unlike the average or AUC — it depends on just one sample and so can be sensitive to brief noise spikes.
Below, we’ll collect the peak voltage of each burst into a list (this is simply the voltage at each detected peak).
# Collect the peak voltage for each curl
peak_voltages = [recording[peak_idx] for peak_idx in peaks]

# Print results
for i, peak_val in enumerate(peak_voltages):
    print(f'Curl {i + 1}: Peak EMG = {peak_val:.4f} mV')
print(f'\nMean peak across all curls: {np.mean(peak_voltages):.4f} mV')
print(f'Standard deviation:          {np.std(peak_voltages):.4f} mV')
Curl 1: Peak EMG = 0.1652 mV
Curl 2: Peak EMG = 0.1933 mV
Curl 3: Peak EMG = 0.2421 mV
Curl 4: Peak EMG = 0.2041 mV
Curl 5: Peak EMG = 0.1820 mV

Mean peak across all curls: 0.1973 mV
Standard deviation:          0.0258 mV
Step 4: Calculate average EMG during each burst#
The average EMG (mean voltage during a contraction) measures the typical activation intensity during a burst. Unlike the peak, it’s less sensitive to single-sample noise. Unlike the AUC, it’s independent of burst duration — making it useful for comparing contractions of different lengths.
Below, we’ll calculate the mean RMS voltage within each standardized burst.
# Calculate mean (average) EMG for each standardized burst
means = []
for start, end in standardized_bursts:
    v_seg = recording[start:end + 1]
    means.append(np.mean(v_seg))

# Print results
for i, mean_val in enumerate(means):
    print(f'Curl {i + 1}: Mean EMG = {mean_val:.4f} mV')
print(f'\nMean across all curls: {np.mean(means):.4f} mV')
print(f'Standard deviation:    {np.std(means):.4f} mV')
Curl 1: Mean EMG = 0.1383 mV
Curl 2: Mean EMG = 0.1554 mV
Curl 3: Mean EMG = 0.1780 mV
Curl 4: Mean EMG = 0.1695 mV
Curl 5: Mean EMG = 0.1553 mV

Mean across all curls: 0.1593 mV
Standard deviation:    0.0136 mV
Step 5: Calculate the area under each burst#
The area under the curve (AUC) of an RMS EMG burst measures total muscle activation — it reflects both how strongly and how long the muscle was recruited during each curl. Sometimes this is called the “integrated EMG.”
Below, we’ll calculate the area using the trapezoidal rule (np.trapezoid), which approximates the area by summing thin trapezoids under the signal. The result is in units of mV·s (millivolt-seconds).
# Calculate AUC for each standardized burst using the trapezoidal rule
areas = []
for start, end in standardized_bursts:
    t_seg = timestamps[start:end + 1] - timestamps[start]
    v_seg = recording[start:end + 1]
    areas.append(np.trapezoid(v_seg, t_seg))

# Print results
for i, area in enumerate(areas):
    print(f'Curl {i + 1}: AUC = {area:.4f} mV·s')
print(f'\nMean AUC: {np.mean(areas):.4f} mV·s')
print(f'Standard Deviation of AUC: {np.std(areas):.4f} mV·s')
Curl 1: AUC = 0.1384 mV·s
Curl 2: AUC = 0.1555 mV·s
Curl 3: AUC = 0.1782 mV·s
Curl 4: AUC = 0.1697 mV·s
Curl 5: AUC = 0.1555 mV·s

Mean AUC: 0.1594 mV·s
Standard Deviation of AUC: 0.0136 mV·s
Step 6: Save results to a CSV file#
Finally, let’s collect the peak, average, and AUC values for each curl into a single table and save it as a CSV file. This makes it easy to open the results in Excel, Google Sheets, or reload them for further analysis in Python.
Each row is one curl; the columns are the peak time, peak voltage, average voltage, and AUC.
import pandas as pd

# Combine the peak, mean, and AUC results into one table (one row per curl)
results = pd.DataFrame({
    'curl':        np.arange(1, len(peaks) + 1),
    'peak_time_s': np.round(timestamps[peaks], 4),
    'peak_mV':     peak_voltages,
    'mean_mV':     means,
    'auc_mV_s':    areas,
})

# Save alongside the input file, e.g. "baseline_1.txt" -> "baseline_1_results.csv"
output_filename = filename.rsplit('.', 1)[0] + '_results.csv'
results.to_csv(output_filename, index=False)

print(f'Saved results to {output_filename}')
results
Saved results to sample_data/baseline_3_results.csv
| curl | peak_time_s | peak_mV | mean_mV | auc_mV_s | |
|---|---|---|---|---|---|
| 0 | 1 | 6.045 | 0.165163 | 0.138273 | 0.138431 |
| 1 | 2 | 24.255 | 0.193277 | 0.155400 | 0.155490 |
| 2 | 3 | 38.870 | 0.242122 | 0.178003 | 0.178161 |
| 3 | 4 | 56.305 | 0.204099 | 0.169533 | 0.169656 |
| 4 | 5 | 71.355 | 0.182009 | 0.155319 | 0.155455 |